judgeinfo
How to Fix Snipping Tool Not Working on Windows 11 – 8 Proven Methods
The Snipping Tool is one of the simplest and most useful features in Windows 11. It lets you take quick screenshots without needing extra software. But when the Snipping Tool stops working, it can be frustrating. Some users experience crashes, a missing shortcut, or the tool failing to save screenshots properly. The problem can stem from software bugs, system updates, or incorrect settings.
If you’re struggling with this issue, don’t worry. There are several ways to fix it, and most of them are straightforward. Whether the tool is crashing, not responding, or simply not opening, this guide will walk you through the solutions step by step.
8 Ways to Fix Snipping Tool on Windows 11
Here’s a concise explanation of how to fix the Snipping Tool on Windows 11 if it's not working as expected, helping you restore its functionality quickly.
Restart Your Computer
Before diving into complex fixes, restart your PC. A simple reboot can resolve temporary system glitches that may be preventing the Snipping Tool from functioning properly.
Windows has several background services running that aid inbuilt tools. Occasionally, these services are corrupt or fail to load correctly, making apps like the Snipping Tool malfunction. Restarting the machine revives these processes and removes temporary files that may be interfering.
Restart and try opening the Snipping Tool again, and see if it functions.
Check for Windows Updates
Microsoft regularly releases updates that correct errors and enhance system performance. If the Snipping Tool is malfunctioning because of a software flaw, an update could correct the problem.
To check for updates:
- Open Settings by pressing Win + I
- Navigate to Windows Update
- Click Check for updates and install any pending updates
- Restart your computer after the update is installed
If the problem started after a recent Windows update, you might need to uninstall that update. Go to Settings > Windows Update > Update History, locate the problematic update, and remove it.
Repair or Reset the Snipping Tool
Windows allows users to repair or reset apps that are not working correctly. If the Snipping Tool isn’t responding, crashes frequently, or won’t open, repairing or resetting it can help.
Here’s how to do it:
- Open Settings and go to Apps > Installed Apps
- Find the Snipping Tool and click Advanced Options
- Click Repair – Windows will try to fix any internal errors
- If repairing doesn't work, click Reset to restore it to the default settings
Resetting the app removes any custom settings but doesn’t delete saved screenshots. After resetting, try launching the Snipping Tool again.
Run Windows Troubleshooter
Windows has a built-in troubleshooter designed to detect and fix common app problems. Running it can help if the Snipping Tool isn't functioning properly.
To use the troubleshooter:
- Open Settings and go to System > Troubleshoot > Other Troubleshooters
- Scroll down and find Windows Store Apps
- Click Run and let Windows scan for issues
If the troubleshooter finds a problem, it will suggest fixes. Follow the on-screen instructions to apply them and check if the Snipping Tool starts working.
Reinstall the Snipping Tool
If the Snipping Tool is corrupted or missing essential files, reinstalling it can restore functionality. Since the Snipping Tool is a Windows app, you can reinstall it through the Microsoft Store.
- Open Settings > Apps > Installed Apps
- Locate Snipping Tool, click the three-dot menu, and select Uninstall
- Restart your PC
- Open the Microsoft Store, search for Snipping Tool, and reinstall it
Reinstalling ensures you have the latest version with fresh system files.
Check Background App Permissions
Windows 11 restricts certain apps from running in the background to save system resources. If the Snipping Tool doesn’t open properly or closes unexpectedly, it might be due to background restrictions.
- Open Settings > Apps > Installed Apps
- Find the Snipping Tool and click Advanced Options
- Scroll down to Background app permissions
- Set it to Always
This allows the Snipping Tool to run smoothly without being blocked by Windows' resource-saving settings.
Disable Focus Assist
Focus Assist is a feature in Windows 11 that suppresses notifications and distractions. However, it sometimes interferes with the Snipping Tool, preventing it from displaying notifications or capturing screenshots properly.
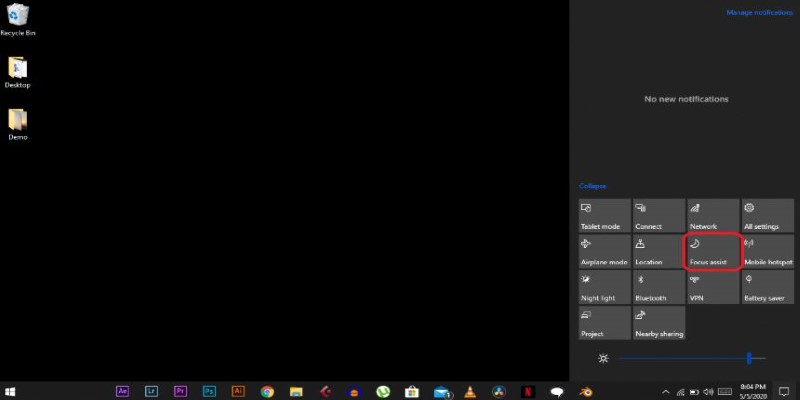
To disable Focus Assist:
- Open Settings > System > Focus Assist
- Choose Off to disable it completely
- Try using the Snipping Tool again
If turning off Focus Assist solves the problem, you can customize its settings to prevent interference in the future.
Use an Alternative Screenshot Method
If none of the fixes work, you can use alternative screenshot methods while troubleshooting. Windows offers multiple ways to take screenshots:
- Win + Shift + S: Opens the Snipping Tool’s overlay, allowing users to capture a selected screen area and copy it to the clipboard.
- Print Screen (PrtScn): This function captures the entire screen and copies it to the clipboard, which requires pasting into an image editor for saving or editing.
- Windows + PrtScn: This function takes a full-screen screenshot and automatically saves it in the Pictures > Screenshots folder without additional steps or manual pasting.
- Xbox Game Bar (Win + G): Opens the built-in Windows Game Bar, allowing users to capture screenshots or record gameplay videos without external software.
Conclusion
The Snipping Tool is an essential Windows 11 feature, but issues like crashes, unresponsiveness, or failure to save screenshots can disrupt its functionality. Fortunately, fixing it is often simple. Restarting your PC, updating Windows, repairing or resetting the tool, and checking background permissions can resolve most problems. If needed, reinstalling the app or using Windows’ built-in troubleshooters can help. When all else fails, alternative screenshot methods like Win + Shift + S or Print Screen ensure you’re not stuck. Keeping Windows updated and managing app settings can prevent future issues, ensuring the
Related Articles

Struggling with Video Formats? Try These 5 Free Converters
Unlock Windows 10: 5 Free Activation Tools to Try
How to Fix Snipping Tool Not Working on Windows 11 – 8 Proven Methods

Best Online Converters for WMV to GIF: Quick and Easy Guide

Convert iPhone Photos to JPEG: Quick and Easy Methods

Top FTP Software for Mac Users: Free and Reliable Options

Converting HEVC to JPG: A Simple Guide

Top Tools for Effortless Batch Image Resizing in 2025

Transform Your Presentations with These Free PPT Template Tools

Unlocking Expert Knowledge for Free: Top Question-Answering Platforms

Top 7 Best AI Image Pixel Resizers for Perfect Image Quality