Convert iPhone Photos to JPEG: Quick and Easy Methods
If you’ve ever tried sharing iPhone photos and found them in an unfamiliar format, you’re not alone. Apple introduced the HEIC format with iOS 11 to reduce file sizes without losing quality. While this works well within Apple’s ecosystem, it causes issues when sharing images with devices or platforms that only support JPEG.
Many users only realize this when transferring photos or uploading them online, to find them incompatible. Fortunately, converting iPhone photos to JPEG is simple. For a quick fix or permanent solution, several inbuilt options, online websites, and apps can assist with making your pictures universally compatible.
Easy Ways to Convert iPhone Photos into JPEG
Converting iPhone photos into JPEG is quite straightforward, and there are several simple methods to get the job done:
Changing iPhone Camera Settings to Capture JPEGs Instead of HEIC
The simplest way to prevent conversion is to alter the default photo format from your iPhone's settings. Rather than taking images in HEIC, you can have your camera save all the images in JPEG format. To do this, open the Settings app on your iPhone, go to Camera, and then press on Formats. Under the Camera Capture section, choose "Most Compatible" over "High Efficiency."
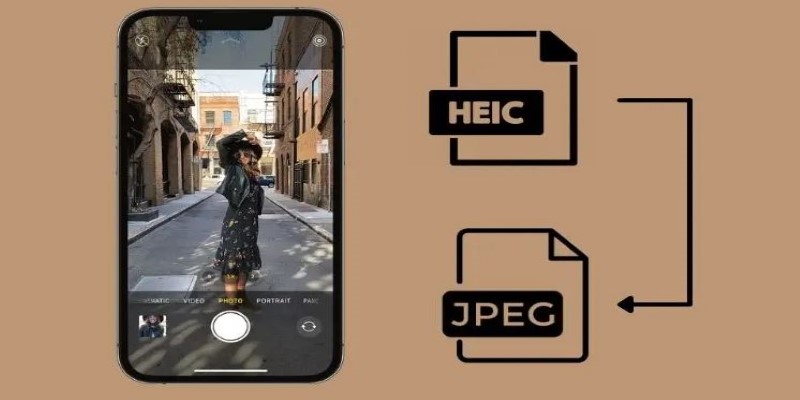
By doing this, all new pictures you take with your iPhone will be stored as JPEG files instead of HEIC. However, JPEG files occupy more space. If your device has limited storage, you might want to stick with HEIC and convert files as necessary.
Using the Photos App to Convert HEIC to JPEG
If you already have HEIC photos and need to convert them to JPEG, the Photos app on your iPhone provides a simple solution without requiring third-party apps. The easiest method is to copy and paste the image into the Files app, which automatically converts it. Open the Photos app and select the image you want to convert. Tap the share button and choose "Copy Photo." Next, open the Files app, navigate to "On My iPhone," and paste the image into a folder. The pasted image will be saved in JPEG format.
This method is convenient for quickly converting single photos, but it may not be the best option if you need to convert multiple images at once.
Using Online Tools to Convert iPhone Photos to JPEG
Online conversion tools provide a fast and convenient solution for users who need to convert multiple HEIC photos at once. Websites such as HEICtoJPEG.com, CloudConvert, and Convertio allow users to upload HEIC files and download them as JPEGs with just a few clicks.
To use an online converter, open the website in your browser and upload the HEIC images from your iPhone. The site will process the files and provide a JPEG version for download. Since these tools require an internet connection, they may not be ideal for users who frequently need to convert images offline. Additionally, be mindful of privacy concerns when uploading personal images to online platforms.
Using Third-Party Apps for HEIC to JPEG Conversion
Another efficient way to convert iPhone photos to JPEG is by using dedicated apps from the App Store. Apps like HEIC Converter, JPEG-PNG Image File Converter, and iMazing HEIC Converter allow users to convert images in bulk and save them as JPEG files.
After downloading one of these apps, open it and grant permission to access your photos. Select the HEIC images that need to be converted and tap the convert button. The app will process the images and save them in JPEG format, making them easier to share and upload. Some of these apps also offer additional features, such as resizing images or adjusting compression levels.
For users who frequently need to convert HEIC files, using an app is often more convenient than relying on online tools. These apps work offline, ensuring that you can convert images anytime without requiring an internet connection.
Converting HEIC to JPEG on a Mac or PC
Converting HEIC to JPEG on a Mac or PC is simple, whether you want to convert a single image or multiple files at once. On a Mac, the Preview app provides a quick solution. Open the HEIC photo in Preview, click "File" in the menu bar, then select "Export." Choose JPEG as the format, adjust the image quality if needed, and save the file. For batch conversion, Mac users can use the Photos app. Select multiple HEIC images, click "File," then "Export," and set JPEG as the output format.
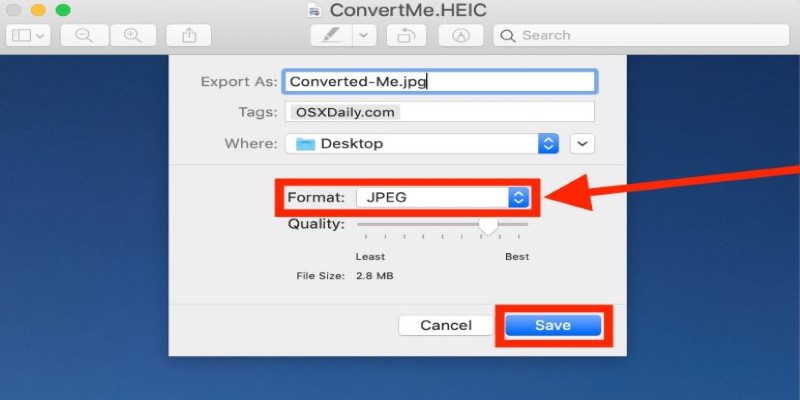
Windows users may need to install the HEIF Image Extensions from the Microsoft Store to view HEIC files. If conversion is required, the Paint app provides a built-in option. Right-click the HEIC image, select "Open with," choose Paint, then click "File" and "Save As." Pick JPEG as the format and save the file.
These methods are useful for those who transfer photos to a computer before editing or sharing. Adjusting iPhone transfer settings can eliminate manual conversion by ensuring images are automatically saved as JPEG when transferred.
Ensuring iPhone Transfers Photos as JPEG Instead of HEIC
iPhones default to transferring HEIC photos, which can cause compatibility issues. To ensure your iPhone automatically converts photos to JPEG when transferring to a Mac or PC, open Settings, go to Photos, and find the Transfer to Mac or PC section. Select Automatic instead of Keep Original.
This setting ensures all transferred photos are in JPEG format, eliminating the need for manual conversion. It’s especially helpful for users who frequently move photos for editing or sharing, making file management smoother and ensuring broader compatibility across different devices and platforms.
Conclusion
Converting iPhone photos to JPEG is easy, whether you adjust camera settings, use built-in tools, or rely on third-party apps. If you prefer an automatic solution, setting your iPhone to save or transfer photos as JPEG prevents compatibility issues. For existing HEIC files, conversion options on iPhone, Mac, Windows, and online tools ensure seamless sharing. By choosing the right method, you can avoid format restrictions and make sure your photos are always ready for viewing, editing, or uploading anywhere.
On this page
Easy Ways to Convert iPhone Photos into JPEG Changing iPhone Camera Settings to Capture JPEGs Instead of HEIC Using the Photos App to Convert HEIC to JPEG Using Online Tools to Convert iPhone Photos to JPEG Using Third-Party Apps for HEIC to JPEG Conversion Converting HEIC to JPEG on a Mac or PC Ensuring iPhone Transfers Photos as JPEG Instead of HEIC ConclusionRelated Articles
How to Decide Between 600 and 1200 DPI for Best Results
Top Free AI Background Generators You Should Try
Boost Network Security Using a Free API Port Summary Tool
Unlock Windows 10: 5 Free Activation Tools to Try

Find Your Ideal Photo Editing Software: 7 Lightroom Alternatives to Consider
Transform Your Social Media Approach: 5 Free Management Tools
How to Repair DLL Errors on Windows 10 for Free: 5 Tools

No Account? No Problem! 10 Sites to Watch Free Movies Instantly
Transform Your Presentations with These Free PPT Template Tools
Redis GUI Solutions: 5 Free Tools for Smarter Data Handling

 judgeinfo