Procreate Background Removal Made Easy: 3 Powerful Methods and a Bonus Tip
Procreate is a favorite among digital artists for its flexibility and ease of use, but one thing that often stumps beginners is removing a background. Whether you’re trying to make a transparent PNG, clean up an image, or extract a subject for a new composition, knowing how to remove backgrounds efficiently can make a big difference.
Fortunately, Procreate provides a variety of methods through which the user can do background erasing; each works for a different set of images and projects. This article will highlight all the 3 top methods of background removal, in addition to one bonus method that you might not have generally considered.
Method 1: Using the Automatic Selection Tool
If you want an instant and simple solution to remove a background in Procreate, then the automatic selection tool is your go-to tool. It proves effective if the background is filled or highly contrasted against the subject.
Begin by opening your painting in Procreate and choosing the 'S' shape icon at the top of the screen, which is the Selection tool. Next, select 'Automatic' mode. Touch the background and drag your finger to resize the selection threshold. A higher percentage will select more of the area, whereas a low percentage will keep it tight. If Procreate is selecting too much or too little, adjust until only the background is isolated.
Once the selection is nice, tap on the three-dot menu and select 'Invert Selection.' This reverses the selection so that rather than the background, your subject is now selected. Tap on 'Cut' or 'Clear' from the Layers panel, and voilà, the background is erased. This is a quick method but is useful only if the background has clean, well-defined edges. If the selection appears jagged, refine the edges by using the smudge or eraser tool.
Method 2: Erasing with the Freehand Selection Tool
Sometimes, the automatic selection tool struggles with intricate or multicolored backgrounds, making it difficult to get a clean cutout. In such cases, the Freehand Selection tool gives you more precision and control over the background removal process. This method is particularly useful when dealing with subjects that have uneven edges, fine details, or areas that require a manual touch.

To use this method, tap on the Selection tool and choose ‘Freehand.’ Carefully trace around the subject, ensuring that you stay close to the edges. If needed, zoom in for better accuracy. Once the selection is complete, tap ‘Invert Selection’ to target the background instead of the subject.
Now, switch to the Eraser tool and begin erasing inside the selection. Since the subject is protected, you can remove the background without worrying about cutting into important details. Adjust the eraser’s size and hardness for a cleaner effect, especially when working around hair or soft textures. This technique takes longer than the automatic selection method but provides greater accuracy, making it a preferred choice for complex extractions.
Method 3: Using Layer Masks for a Non-Destructive Edit
If you prefer a method that allows flexibility and prevents irreversible mistakes, using a layer mask is the ideal approach. Instead of permanently erasing the background, layer masks let you hide or reveal parts of the image non-destructively. This means you can refine the cutout at any time without losing any details.
To start, duplicate the original layer as a backup. Then, tap on the layer and select ‘Mask.’ This adds a white thumbnail next to the layer, representing the visible areas. Switch to a black brush and carefully paint over the background—anything painted black will disappear, while anything left white will remain. If you make a mistake, simply switch to a white brush to restore parts of the image.
For soft edges, such as hair or fabric, use a soft, low-opacity brush to blend areas naturally. This method works well for images requiring fine adjustments, as you can refine edges without permanently altering the subject. Since the original image remains intact, layer masks are perfect for professional projects where precise background removal is crucial.
Bonus Option: Magic Wand + Gaussian Blur for Smooth Cutouts
If your cutout appears too sharp or has unnatural edges, refining it with Gaussian Blur can create a softer, more natural transition. This is especially helpful for digital paintings, semi-realistic artwork, or when integrating multiple images into a single composition. Harsh edges can make a subject look artificially pasted onto a new background, but a subtle blur can improve blending and realism.
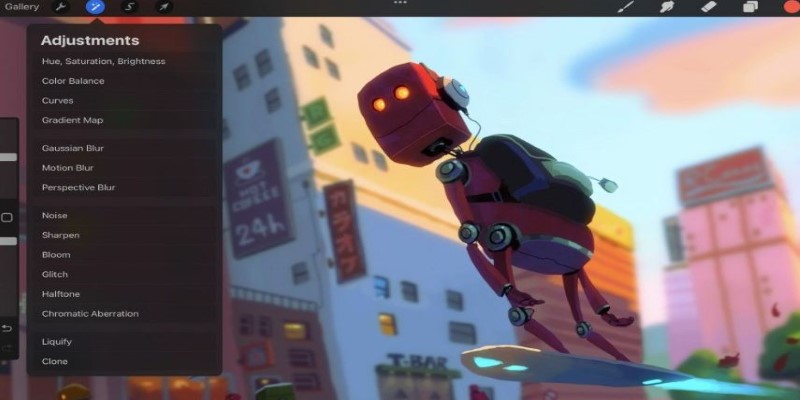
After using one of the background removal methods, navigate to the Adjustments menu (magic wand icon) and select ‘Gaussian Blur.’ Slide your finger across the screen to adjust the blur intensity. A slight blur of just a few percent is usually enough to smooth jagged edges without making the subject appear out of focus. If needed, apply the blur selectively using a layer mask to maintain sharpness in key areas while softening the edges.
This technique is especially useful for artists who work with layered compositions, ensuring that all elements blend seamlessly. It’s a quick and effective finishing touch that helps avoid a cut-and-paste look, giving your artwork a more polished and professional feel.
Conclusion
Removing a background in Procreate is easier than it seems once you know the right techniques. Whether you use the automatic selection tool for speed, the freehand selection tool for precision, layer masks for flexibility, or Gaussian blur for smooth blending, each method offers unique benefits. The best approach depends on your image and how refined you want the final result to be. With a bit of practice, Procreate background removal will become second nature, helping you create cleaner and more polished artwork. Experiment with these techniques to see which works best for your projects and enhance your digital creations effortlessly!
Related Articles
Transform Your Social Media Approach: 5 Free Management Tools

No Account? No Problem! 10 Sites to Watch Free Movies Instantly
Unlocking the World of Free E-Books: Best Search Tools to Use

Top Tools for Effortless Batch Image Resizing in 2025
Fast and Easy AVIF to JPG Conversion: 5 Offline Converters

Pixel vs. Dot Explained: Mastering Photo Resolution for Printing
Where to Find Free Media Resources: 3 Best Websites
How to Decide Between 600 and 1200 DPI for Best Results

Choose 5 Free Instant Messengers: Enhance Your Messaging Experience
Converting HEVC to JPG: A Simple Guide
Top FTP Software for Mac Users: Free and Reliable Options
 judgeinfo